|
|
|
| This document is available in: English Castellano Deutsch Francais Nederlands Russian Turkce |
![[Photo of the Author]](../../common/images/ChianglinNg.jpg)
by Chianglin Ng <chglin(at)singnet.com.sg> About the author: I live in Singapore, a modern multiracial country located in Southeast Asia. I have been using linux for the past 2 years or so. The first distribution that I started out with was redhat 6.2. Today I am using redhat 8.0 at home. I also use debian woody occassionally. Content: |
Accessing PostgreSQL through JDBC via a Java SSL tunnel![[Illustration]](../../common/images/article285/HeaderImage.jpg)
Abstract:
This article shows how to set up JDBC access for PostgreSQL on
redhat 8.0 and how to create a SSL tunnel using Sun's Java
Secured Socket Extensions, to enable secured access to a remote
postgres database.
|
The instructions provided here are for redhat 8.0 but the general principles are applicable to other distributions. You need to install PostgreSQL and the corresponding JDBC drivers if you haven't done so. On redhat 8, you can use the rpm command or the GUI package management tool. You also need to download and install Sun's JDK 1.4.1. Sun's JDK comes with some encryption restrictions due to US export regulations. To get unlimited strength encryption, you can download the JCE (Java Crytographic Extensions) policy files. Visit Sun's Java website for more information.
I have installed JDK1.4.1 in /opt and set up JAVA_HOME environment variable to point to my JDK directory. I have also updated my PATH to include the directory containing the JDK executables. The following shows the lines that are added to my .bash_profile file.
JAVA_HOME = /opt/j2sdk1.4.1_01
PATH = /opt/j2sdk1.4.1_01/bin:$PATH
export JAVA_HOME PATH
The limited encryption policy files that come with Sun JDK have also been replaced with the unlimited ones in the JCE. To enable java to find the JDBC drivers for postgres, I copy the postgre-jdbc drivers into my Java extensions directory (/opt/j2sdk1.4.1_01/jre/lib/ext). In redhat 8.0, the postgres-jdbc drivers are located in /usr/share/pgsql.
If this is your first postgresql installation, you will have to create a new database and a new postgresql user account. First su to root and start the postgres service. Then change to the default postgres administrator account.
su root
password:******
[root#localhost]#/etc/init.d/postgresql start
[root#localhost]# Starting postgresql service: [ OK ]
[root#localhost]# su postgres
[bash]$
Create a new postgres account and database.
[bash]$:createuser
Enter name of user to add: chianglin
Shall the new user be allowed to create databases? (y/n) y
Shall the new user be allowed to create more new users? (y/n)
y
CREATE USER
[bash]$createdb chianglin
CREATE DATABASE
I have created a new postgres administrator account that corresponds to my linux user account and a database of the same name. By default when you run the psql tool, it will connect to a database that corresponds to the current linux user account. Refer to the postgres manual for more details on administering accounts and database. To set a password for your created account, you can run psql and issue ALTER USER command. Log in using your normal user account and start up psql. Issue the following
ALTER USER chianglin WITH PASSWORD 'test1234' ;
To allow for tcp/ip connections, you need to edit postgresql.conf and set the tcpip_socket option to true. On redhat 8, this file is located at /var/lib/pgsql/data. Change to root and set the following
tcpip_socket=true
The last step is to edit the pg_hba.conf file. It specifies the hosts that can connect to the postgres database. I have added a single new host entry specifying the loopback address of my pc and that it is using password authentication. You need to change to root inorder to edit this file.
host sameuser 127.0.0.1 255.255.255.255 password
Restart postgres and all your new settings will take
effect.
After the previous step, postgres is ready to accept unsecured local JDBC connections. To access postgres securely from a remote location, some form of relaying is required.
The following diagram shows how this relaying should work.
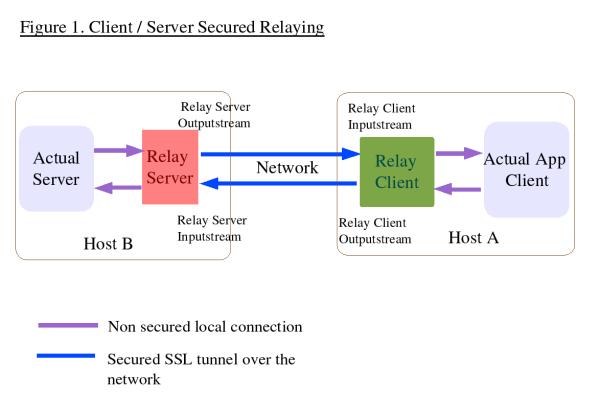
The JDBC application will connect to the client proxy which will then relay all the data through a SSL connection to our remote server proxy. The server proxy will simply forward all packets to postgres and send replies via the SSL connection back to the client proxy which will relay them to the JDBC application. This entire process will be transparent to the JDBC application.
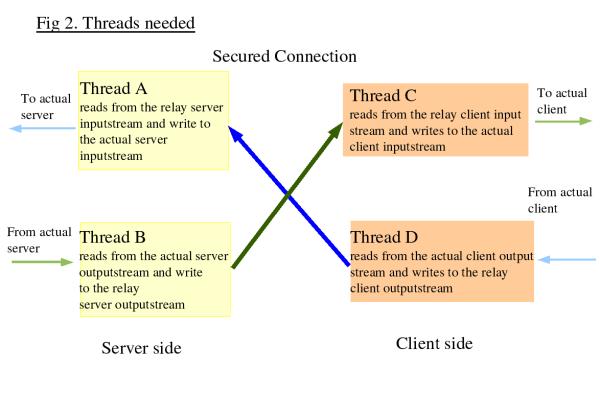
From the diagram it can be seen that at the server end,
there will be a need to get the data from the incoming secured
stream and send it to the local outgoing stream that is
connected to the actual server. The reverse is also true, you
need to get the data from the local incoming stream connected
to the actual server and route it to the secured outgoing
stream. The same concept applies for the client. Threads
can be used to implement this. The following diagram shows
this
A SSL connection usually requires server authentication.
Client authentication is optional. In this case, I prefer to
have both server and client authentication. This means that I
will have to create certificates and keys for both the client
and server. I do this by using the keytool provided by the Java
JDK. I will have a pair of keystores each at the client and
server. The first keystore is needed to store the private key
of the host and the second is to store the certificates that
the host trusts.
The following shows the creation of a keystore, a private key
and a public self-signed certificate for the server.
keytool -genkey -alias serverprivate -keystore
servestore -keyalg rsa -keysize 2048
Enter keystore password: storepass1
What is your first and last name?
[Unknown]: ServerMachine
What is the name of your organizational unit?
[Unknown]: ServerOrg
What is the name of your organization?
[Unknown]: ServerOrg
What is the name of your City or Locality?
[Unknown]: Singapore
What is the name of your State or Province?
[Unknown]: Singapore
What is the two-letter country code for this unit?
[Unknown]: SG
Is CN=ServerMachine, OU=ServerOrg, O=ServerOrg, L=Singapore,
ST=Singapore, C= [no]: yes
Enter key password for <serverprivate>
(RETURN if same as keystore password): prikeypass0
</serverprivate>
Notice that passwords are requested twice. The first one is for the keystore and the second is for the private key. Once this has been done, export the server public certificate, which the client will use to authenticate the server, to a file.
keytool -export -alias serverprivate -keystore -rfc servestore -file server.cer
The above will export the server self-signed public certificate into the file server.cer. At the client end import this file into a keystore that stores all the public certificates which the client trusts.
keytool -import -alias trustservercert -file server.cer -keystore clienttruststore
The above command will import the server public certificate into a keystore called clientruststore. If this store doesn't yet exist, it will be created and you will be prompted to enter a password for the store.
At this stage, your system will be able to faciliate a SSL
connection which provides for server authentication.
Since I also want to authenticate the client, I will need to
create a private/public key for the client in a new client
keystore, export out the client public certificate and import
it into a new server keystore at the server end.
At the end of this process, there should be two keystores in
the server, one for holding its private key and the other for
holding the certificates it trust. It is the same for the
client.
In order to run the example code which I provide later, it is essential that you set the same password for each keystore that you create on a particular machine. This means that the two keystores in the server should have the same password. The same goes to the 2 keystores in the client.
You can refer to Sun's documentation to learn more about using keytool.My classes will make use of the Sun's Java Secured Socket extensions. The Sun JSSE reference guide is available at http://java.sun.com/j2se/1.4.1/docs/guide/security/jsse/JSSERefGuide.html. For a ssl connection, you need to get an instance of a SSLContext object provided by JSSE. Initialize this SSLContext with the settings you want and obtain a Secured SocketFactory class from it. The socketfactory can be used to create the ssl sockets.
For my implementation, there will be a client and a server
proxy class to construct the SSL tunnel. Since they will both
be using a SSL connection, they shall inherit from a base
SSLConnection class. This class will be responsible for setting
up the initial SSLContext that will be used by both the client
and server proxies. Finally, we need another class to implement
the relaying threads. A total of 4 classes in all.
The following shows the code snippet from SSLConnection
class
Snippet from SSLConnection class
/* initKeyStore method to load the keystores
which contain the private key and the trusted certificates
*/
public void initKeyStores(String key , String trust , char[]
storepass)
{
// mykey holding my own certificate and
private key, mytrust holding all the certificates that I
trust
try {
//get instances of the Sun JKS
keystore
mykey = KeyStore.getInstance("JKS" ,
"SUN");
mytrust = KeyStore.getInstance("JKS",
"SUN");
//load the keystores
mykey.load(new
FileInputStream(key) ,storepass);
mytrust.load(new FileInputStream(trust) ,storepass
);
}
catch(Exception e) {
System.err.println(e.getMessage());
System.exit(1);
}
}
/* initSSLContext method to obtain a SSLContext and
initialize it with the SSL protocol and data from the keystores
*/
public void initSSLContext(char[] storepass , char[] keypass)
{
try{
//get a SSLContext from Sun JSSE
ctx = SSLContext.getInstance("TLSv1" , "SunJSSE")
;
//initializes the keystores
initKeyStores(key , trust , storepass) ;
//Create the key and trust manager
factories for handing the cerficates
//in the key and trust stores
TrustManagerFactory tmf =
TrustManagerFactory.getInstance("SunX509" ,
"SunJSSE");
tmf.init(mytrust);
KeyManagerFactory kmf =
KeyManagerFactory.getInstance("SunX509" ,
"SunJSSE");
kmf.init(mykey , keypass);
//initialize the SSLContext with the data from
the keystores
ctx.init(kmf.getKeyManagers() ,
tmf.getTrustManagers() ,null) ;
}
catch(Exception e) {
System.err.println(e.getMessage());
System.exit(1);
}
}
The initSSLContext method creates a SSLContext from Sun
JSSE. During the creation, you can specify the SSL protocol to
use. In this case, I have chosen to use TLS (Transport Layer
Security) version 1. Once an instance of the SSLContext is
obtained, it is initialzed with the data from the
keystores.
The following code snippet is from the SSLRelayServer class
which will run on the same machine as the postgres database. It
will relay all client data coming from the SSL connection to
postgres and vice versa.
SSLRelayServer class
/* initSSLServerSocket method will get the
SSLContext via its super class SSLConnection. It will then
create a SSLServerSocketFactory object that will be used
to create a SSLServerSocket. */
public void initSSLServerSocket(int localport) {
try{
//get
the ssl socket factory
SSLServerSocketFactory
ssf = (getMySSLContext()).getServerSocketFactory();
//create the ssl socket
ss
= ssf.createServerSocket(localport);
((SSLServerSocket)ss).setNeedClientAuth(true);
}
catch(Exception e) {
System.err.println(e.getMessage());
System.exit(1);
}
}
// begin listening on SSLServerSocket and wait for incoming
client connections
public void startListen(int localport , int destport) {
System.out.println("SSLRelay server started
at " + (new Date()) + " " +
"listening
on port " + localport + " " + "relaying to
port " + destport );
while(true) {
try {
SSLSocket incoming
= (SSLSocket) ss.accept();
incoming.setSoTimeout(10*60*1000); // set 10 minutes time
out
System.out.println((new Date() ) + " connection from " +
incoming );
createHandlers(incoming,
destport); // create 2 new threads to handle the incoming
connection
}
catch(IOException e ) {
System.err.println(e);
}
}
}
RelayApp class, the client proxy, is similar to SSLRelayServer.
It inherits from SSLConnection and uses 2 threads to do the
actual relaying. The difference is that it creates a SSLSocket
to connect to the remote host rather than a
SSLServerSocket for listening to incoming connections. The last
class that we need is the thread that does the actual relaying.
It simply read data from a inputstream and write them out to a
outputstream.
On the client, you will need these files SSLConnection.java, RelayIntoOut.java and RelayApp.java. On the server side, you need SSLRelayServer.java, RelayIntoOut.java and SSLConnection.java. Put them together in a directory. To compile the client proxy, issue the following command.
javac RelayApp.java
To compile the server proxy, issue the following
javac SSLRelayServer.java
On your server machine running postgres, you can fire up SSLRelayServer with 6 command line arguments. They are
java SSLRelayServer servestore trustclientcert storepass1 prikeypass0 2001 5432
Once the server proxy is running, you can start the client proxy. The client proxy will take in 7 arguments, the additional being the hostname or IP address of the server you are connecting to. The arguments are
java RelayApp clientstore trustservercert clistorepass1 cliprikeypass0 localhost 2001 5432
Once the SSL tunnel is established. You can start up your JDBC application and connect to postgres in the usual way. The entire relaying process will be transparent to your JDBC application. This article is already too long and I shall not provide examples for a JDBC application here. The postgres manual and sun tutorial contains many examples on JDBC.
If you want to run everything on a single machine during testing, you can do so too. There are two ways to do this, either set your postgres database to listen on a different port, or you can set the port number that RelayApp is relaying for to another port. I shall use the latter to illustrate a simple test. First, quit RelayApp, you will have to send it the kill signal by pressing [ctrl] c. You also use the same method to stop the SSLRelayServer proxy.
Fire up RelayApp again with the following command. The only change is the last port number, it is 2002 now.
java RelayApp clientstore trustservercert clistorepass1 cliprikeypass0 localhost 2001 2002
The best application to use for testing will be psql itself. We will be relaying all psql traffic to postgres through our tunnel. Issue the following command to start psql for testing.
psql -h localhost -p 2002
The command directs psql to connect to localhost at port 2002 which our RelayApp is listening. After entering your postgres password, you can start executing SQL commands as usual and test the SSL connection that is now doing the relaying.
It isn't a good idea to specify passwords as command line argument if you are sharing a pc. This is because someone executing the command ps -auxww will be able to see the full command string of your process, including the passwords. It is better to store the passwords in an encrypted form on another file and let your java app read from there. Alternatively you can use Java Swing to create a dialog box that prompts for password.
It is simple to use Sun JSSE for the creation of a
SSLtunnel that can be used by postgres. In fact, any other
applications that require a secured connection can probably use
this SSL tunnel. There are so many ways to add encryption
to your connection, just fire up your favourite linux editor
and start coding. Have fun !
|
|
Webpages maintained by the LinuxFocus Editor team
© Chianglin Ng, FDL LinuxFocus.org |
Translation information:
|
2003-02-17, generated by lfparser version 2.35