|
|
|
| This document is available in: English Castellano ChineseGB Deutsch Francais Nederlands Russian Turkce |

by Vincent Renardias <vincent(at)renardias.com> About the author: GNU/Linux user since 1993, Vincent Renardias started to get involved in its development in 1996: Debian developer, French translator of The GIMP and GNOME desktop, founder of the Linux User Group in Marseille (PLUG)... Now R&D manager for the EFB2 company, he keeps contributing to GNU/Linux. Translated to English by: Georges Tarbouriech <gt(at)linuxfocus.org> Content: |
Packet filtering with Linux![[Illustration]](../../common/images/article289/illustration289.jpg)
Abstract:
This article was first published in a Linux Magazine France special issue focusing on security. The editor, the authors and the translators kindly allowed LinuxFocus to publish every article from this special issue. Accordingly, LinuxFocus will bring them to you as soon as they are translated to English. Thanks to all the people involved in this work. This abstract will be reproduced for each article having the same origin.
|
The filtering mechanism can be considered as a net which
will stop some unwanted packets. The most important thing is to find
the right size of the mesh and the right place to install
it.
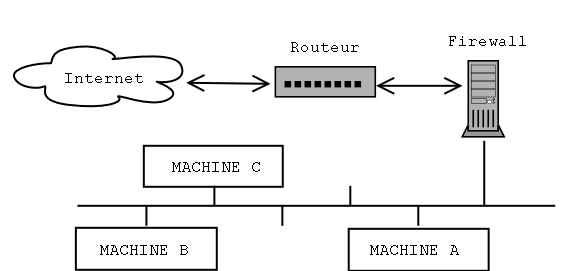
To be able to properly filter the packets, the filtering
mechanism must be physically inserted between the network it
protects and the "rest of the world". Practically this is done
with a machine holding two network interfaces (usually
Ethernet), one connected to the internal network and the other
to the router allowing the access to the outside. This way,
communications will have to go through the firewall which will
block them or not according to their content.
The machine holding the filtering mechanism can be configured
in 3 different ways:
- "simple" gateway: this is the most common configuration. The
machine is used as a gateway between two networks or
subnetworks. The computers in the local network shall be
configured to use the firewall instead of the router as their
default route.
- "Proxy-ARP" gateway: the previous configuration implies the
division of the network into two subnetworks, what makes half
the available IP addresses being lost. This is a bit annoying.
In the example of a
16 addresses subnetwork (with a 28 bit netmask), only 14 are
available, since the network and the broadcast addresses are in
use. Adding 1 bit to the subnetmask, we decrease from 14 to
only 6 available addresses (8 IPs minus the network and
broadcast ones). When you cannot afford to lose half the
available IPs, you can use this technique which is explained a
bit later in this article. Furthermore, this technique does not
require any changes in the network configuration of the
existing machines neither the router nor the protected
computers.
- Ethernet bridge: installing an Ethernet gateway (not an IP
gateway), makes the filtering mechanism invisible from other
machines. Such a configuration can be done without assigning IP
addresses to the Ethernet interfaces. The machine then becomes
undetectable with ping, traceroute, etc. Let us note that a
packet filtering implementation in such a configuration
requires a 2.2.x kernel since the port of this feature on 2.4.x
kernels is not yet finished.
Now that we know where to install our filter, we must define
what it will have to block or what it will have to accept.
There are two ways to configure such a filter:
- The good one: no packet is allowed but the ones a rule
accepts.
- The bad one: (unfortunately, often used) the explicitely
forbidden packets are stopped, all the others are accepted.
It is simple to explain: in the first case, forgetting a rule
results in a service not working properly or not working at
all. Usually, this is noticed rather quickly and then it is enough to
add the proper rule to make things work again.
In the second case, forgetting a rule creates a potential
vulnerability which may be hard to find... if we find it.
The most used packet filtering software with Linux 2.4 is Netfilter; it nicely replaces 'ipchains' used in Linux kernel 2.2. Netfilter is made of two parts: the kernel support which has to be compiled in your kernel and the 'iptables' command that should be available in your system.
A commented example being better than a long speech, next we will describe how to install and setup a filtering mechanism. First, the machine will be configured as a gateway using Proxy-ARP to limit the number of IP addresses and we will setup the filtering system.
The author has a preference for the Debian distribution to setup such a system, but any other distribution will do.
First, check that your kernel has Netfilter support. If this is true, the boot message should contain:
ip_conntrack (4095 buckets, 32760 max)
ip_tables: (c)2000 Netfilter core team
Otherwise, you will have to recompile the kernel after having activated Netfilter support. The corresponding options are found in the "Network Packet Filtering" submenu of the "Networking Options" menu. From the "Netfilter Configuration" section, select the options you need. When in doubt, you can select all of them. Furthermore, it is better to include Netfilter into the kernel and not use modules. If for some reason or other one of the Netfilter modules was missing or not loaded, filtering would not work and we better don't talk about the risks that this would imply.
You also should install the 'iproute2' package (this last is
not compulsory but our example will use it since it allows us to
make the configuration script simpler). With Debian, it is enough to
type the 'apt-get install iproute' command.
With other distributions, get the corresponding package. The
usual way or install the software from source code that you can
download from the following address:
ftp://ftp.inr.ac.ru/ip-routing/
Now the 2 Ethernet cards have to be configured. We must note
that the Linux kernel, when autodetecting the hardware stops
the search of network cards as soon as it found one.
Accordingly, only the first one is detected.
An easy solution to this problem consists in adding the
following line to the lilo.conf file:
append="ether=0,0,eth1"
Now, we must configure the Ethernet interfaces. The method
we choose allows to use the same IP address for both cards thus
saving one address.
Let us assume that we have a 10.1.2.96/28 subnetwork,
that is addresses starting from 10.1.2.96 to 10.1.2.111
included. The router will have the 10.1.2.97 address and our
filtering machine the 10.1.2.98. The eth0 interface
will be connected to the router through a cross-connect RJ45
cable if both cards are directly connected without using a hub
or a switch; the eth1 interface will be connected to
the hub/switch and from there to the local network machines.
Accordingly both interfaces will be configured with the following parameters:
address  : 10.1.2.98
netmask  : 255.255.255.240
network  : 10.1.2.96
broadcast: 10.1.2.111
gateway  : 10.1.2.97
Next, we use the following script which must be run after
the initial configuration of the network cards to finish the
setup.
net.vars: configuration variables

PREFIX=10.1.2
DMZ_ADDR=$PREFIX.96/28
# Interface definitions
BAD_IFACE=eth0
DMZ_IFACE=eth1
ROUTER=$PREFIX.97


net-config.sh: network configuration script

#!/bin/sh
# Comment out the next line to display the commands at execution time
# set -x
# We read the variables defined in the previous file
source /etc/init.d/net.vars
# We remove the present routes from the local network
ip route del $PREFIX.96/28 dev $BAD_IFACE
ip route del $PREFIX.96/28 dev $DMZ_IFACE
# We define that the local network can be reached through eth1
# and the router through eth0.
ip route add $ROUTER dev $BAD_IFACE
ip route add $PREFIX.96/28 dev $DMZ_IFACE
# We activate Proxy-ARP for both interfaces
echo 1 > /proc/sys/net/ipv4/conf/eth0/proxy_arp
echo 1 > /proc/sys/net/ipv4/conf/eth1/proxy_arp
# We activate the IP forwarding to allow the packets coming to one card
# to be routed to the other one.
echo 1 > /proc/sys/net/ipv4/ip_forward
Let us go back to the Proxy-ARP mechanism required for our
configuration.
When a machine talks to another one in the same network, it
needs to know the Ethernet address (or MAC address or hardware
address) corresponding to its IP address. Then the source
machine broadcasts the question "what is the MAC address of the
interface having the IP address 1.2.3.4 ?", and the destination
machine must answer.
Here is an example of such a "talk" seen using tcpdump:
- the request: the machine 172.16.6.72 asks the MAC address
corresponding to the IP address IP 172.16.6.10.
19:46:15.702516 arp who-has 172.16.6.10 tell
172.16.6.72
- the answer: the machine 172.16.6.10 provides its card
number.
19:46:15.702747 arp reply 172.16.6.10 is-at
0:a0:4b:7:43:71
This leads us to the end of this short explanation: the ARP requests are done by broadcast, thus being limited to only one physical network. Accordingly the request from a protected machine to find the MAC address of the router should be blocked by the filtering machine. Activating the Proxy-ARP feature allows to solve this problem, since it will transfer the ARP requests.
At this stage, you should have a working network with a machine managing the whole traffic between the local network and the outside.
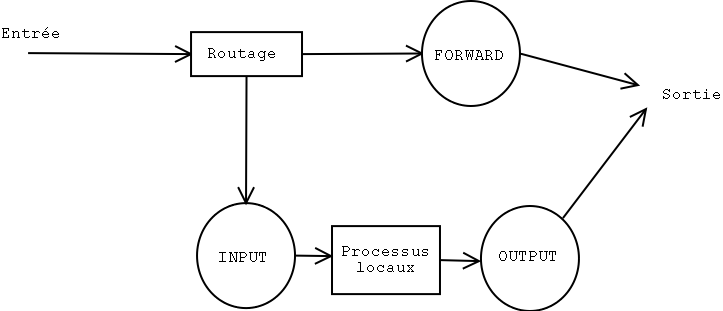
Now, we must setup the filtering using Netfilter.
Netfilter allows to act directly on the packet flow. In the basic
configuration, the packets are managed by 3 rule chains:
- INPUT: for the packets incoming through an interface,
- FORWARD: for all the packets transmitted from an interface to
another one,
- OUTPUT: for the packets outgoing through an interface.
The 'iptables' command allows to add, change or remove rules
in each of these chains to modify the filtering behavior.
Furthermore, each chain has a default policy, that is, it knows
what to do when no rule in the chain matches a packet.
The four most current options are:
- ACCEPT: the packet is allowed to go through,
- REJECT: the packet is rejected and the associated error
packet is sent (ICMP Port Unreachable, TCP RESET, depending on
the case),
- LOG: writes a packet note in syslog,
- DROP: the packet is ignored and no answer is sent.
Here are the main options of iptables allowing to manipulate entire chains. We will detail them later on:
-N: creates a new chain.
-X: removes an empty chain.
-P: changes the default policy of a chain.
-L: lists the rules in a chain.
-F: flushes all the rules in a chain.
-Z: clears the bytes and packets counters having gone through
the chain.
To modify a chain, the following commands are available:
-A: appends a rule to the end of a chain.
-I: inserts a new rule at a given position in a chain.
-R: replaces a given rule in a chain.
-D: deletes a rule in a chain, either using its number or
describing the rule.
Let us see a small practical example: we will block the PING
answers (that is the 'echo-reply' type ICMP packets) coming
from a given machine.
First, let us check that we can "ping" the given machine:
# ping -c 1 172.16.6.74
PING 172.16.6.74 (172.16.6.74): 56 data bytes
64 bytes from 172.16.6.74: icmp_seq=0 ttl=255 time=0.6 ms

--- 172.16.6.74 ping statistics ---

1 packets transmitted, 1 packets received, 0% packet loss
round-trip min/avg/max = 0.6/0.6/0.6 ms
Now, we add a rule into the INPUT chain which will intercept the ICMP-Reply ('-p icmp --icmp-type echo-reply') packets coming from the machine 172.16.6.74 ('-s 172.16.6.74'). These packets will be ignored ('-j DROP').
# iptables -A INPUT -s 172.16.6.74 -p icmp --icmp-type echo-reply -j DROP
Now, let us PING this machine again:
# ping -c 3 172.16.6.74
PING 172.16.6.74 (172.16.6.74): 56 data bytes

--- 172.16.6.74 ping statistics ---

3 packets transmitted, 0 packets received, 100% packet loss
As we could expect, the answers do not pass. We can check that the 3 answers have been blocked (3 packets for 252 bytes):
# iptables -L INPUT -v
Chain INPUT (policy ACCEPT 604K packets, 482M bytes)
 pkts bytes target     prot opt in    out     source       destination
  3   252   DROP       icmp --  any   any     172.16.6.74    anywhere
To go back to the initial situation, we just have to remove the first rule from the INPUT chain:
# iptables -D INPUT 1
Now, PING should work again:
# ping -c 1 172.16.6.74
PING 172.16.6.74 (172.16.6.74): 56 data bytes
64 bytes from 172.16.6.74: icmp_seq=0 ttl=255 time=0.6 ms

--- 172.16.6.74 ping statistics ---

1 packets transmitted, 1 packets received, 0% packet loss
round-trip min/avg/max = 0.6/0.6/0.6 ms
#
It works !
You can add other chains to the 3 pre-existing ones (that you cannot remove anyway) and make some traffic go through them. This can be useful, for instance, to avoid duplicating rules in various chains.
Now, let us setup the required rules for a minimal firewall.
It will allow ssh, domain (DNS), http and smtp services and
nothing else.
To simplify, the setup commands are written in a shell script
to make configuration easier. The script starts flushing out
the present configuration before setting up the new one. This
small trick allows the script to be run when the configuration
is active without the risk of duplicated rules.
rc.firewall

#!/bin/sh

# Flushing out the rules
iptables -F
iptables -F INPUT
iptables -F OUTPUT
iptables -F FORWARD


# The chain is built according to the direction.
# bad = eth0 (outside)
# dmz = eth1 (inside)
iptables -X bad-dmz
iptables -N bad-dmz
iptables -X dmz-bad
iptables -N dmz-bad
iptables -X icmp-acc
iptables -N icmp-acc
iptables -X log-and-drop
iptables -N log-and-drop

# Specific chain used for logging packets before blocking them
iptables -A log-and-drop -j LOG --log-prefix "drop "
iptables -A log-and-drop -j DROP

# The packets having the TCP flags activated are dropped
# and so for the ones with no flag at all (often used with Nmap scans)
iptables -A FORWARD -p tcp --tcp-flags ALL ALL -j log-and-drop
iptables -A FORWARD -p tcp --tcp-flags ALL NONE -j log-and-drop

# The packets coming from reserved addresses classes are dropped
# and so for multicast
iptables -A FORWARD -i eth+ -s 224.0.0.0/4 -j log-and-drop
iptables -A FORWARD -i eth+ -s 192.168.0.0/16 -j log-and-drop
iptables -A FORWARD -i eth+ -s 172.16.0.0/12 -j log-and-drop
iptables -A FORWARD -i eth+ -s 10.0.0.0/8 -j log-and-drop

# The packets belonging to an already established connexion are accepted
iptables -A FORWARD -m state --state INVALID -j log-and-drop
iptables -A FORWARD -m state --state RELATED,ESTABLISHED -j ACCEPT
# The corresponding chain is sent according to the packet origin
iptables -A FORWARD -s $DMZ_ADDR -i $DMZ_IFACE -o $BAD_IFACE -j dmz-bad
iptables -A FORWARD -o $DMZ_IFACE -j bad-dmz
# All the rest is ignored
iptables -A FORWARD -j log-and-drop

# Accepted ICMPs
iptables -A icmp-acc -p icmp --icmp-type destination-unreachable -j ACCEPT
iptables -A icmp-acc -p icmp --icmp-type source-quench -j ACCEPT
iptables -A icmp-acc -p icmp --icmp-type time-exceeded -j ACCEPT
iptables -A icmp-acc -p icmp --icmp-type echo-request -j ACCEPT
iptables -A icmp-acc -p icmp --icmp-type echo-reply -j ACCEPT
iptables -A icmp-acc -j log-and-drop

# Outside -> Inside chain
# mail, DNS, http(s) and SSH are accepted
iptables -A bad-dmz -p tcp --dport smtp -j ACCEPT
iptables -A bad-dmz -p udp --dport domain -j ACCEPT
iptables -A bad-dmz -p tcp --dport domain -j ACCEPT
iptables -A bad-dmz -p tcp --dport www -j ACCEPT
iptables -A bad-dmz -p tcp --dport https -j ACCEPT
iptables -A bad-dmz -p tcp --dport ssh -j ACCEPT
iptables -A bad-dmz -p icmp -j icmp-acc
iptables -A bad-dmz -j log-and-drop

# Inside -> Outside chain
# mail, DNS, http(s) and telnet are accepted
iptables -A dmz-bad -p tcp --dport smtp -j ACCEPT
iptables -A dmz-bad -p tcp --sport smtp -j ACCEPT
iptables -A dmz-bad -p udp --dport domain -j ACCEPT
iptables -A dmz-bad -p tcp --dport domain -j ACCEPT
iptables -A dmz-bad -p tcp --dport www -j ACCEPT
iptables -A dmz-bad -p tcp --dport https -j ACCEPT
iptables -A dmz-bad -p tcp --dport telnet -j ACCEPT
iptables -A dmz-bad -p icmp -j icmp-acc
iptables -A dmz-bad -j log-and-drop

# Chains for the machine itself
iptables -N bad-if
iptables -N dmz-if
iptables -A INPUT -i $BAD_IFACE -j bad-if
iptables -A INPUT -i $DMZ_IFACE -j dmz-if

# External interface
# SSH only accepted on this machine
iptables -A bad-if -p icmp -j icmp-acc
iptables -A bad-if -p tcp --dport ssh -j ACCEPT
iptables -A bad-if -p tcp --sport ssh -j ACCEPT
ipchains -A bad-if -j log-and-drop

# Internal interface
iptables -A dmz-if -p icmp -j icmp-acc
iptables -A dmz-if -j ACCEPT
A few words on the quality of service. Linux can modify the ToS ("Type of Service") field and change its value to give the packet a different priority. For instance, the following command changes the outgoing SSH packets to improve the connecion response.
iptables -A OUTPUT -t mangle -p tcp --dport ssh -j TOS --set-tos Minimize-Delay
In the same way, for FTP connecions you could use the '--set-tos Maximize-Throughput' option, to improve the transfer rate to the detriment of the session interactivity.
That's it. Now, you know the basics to setup an efficient
packet filtering system. However, keep in mind that a firewall
is not the panacea when security is a concern. It only is
another precaution. Setting up a firewall does not prevent you
from using strong passwords, latest security patches, intrusion
detection system, etc.
|
|
Webpages maintained by the LinuxFocus Editor team
© Vincent Renardias, FDL LinuxFocus.org |
Translation information:
|
2003-04-18, generated by lfparser version 2.37