|
|
|
| This document is available in: English Castellano Deutsch Francais Nederlands Turkce |
![[Photo of the Author]](../../common/images/article310/JuanManuelTriana_CarlosAndresPerez.jpg)
by Juan Manuel Triana,Carlos Andrés Pérez <jutriana/at/uniweb.net.co, caperez/at/usaca.edu.co> About the author: Juan Manuel Triana has been working with Linux since its very introduction in Colombia, around 1995. He is a long time Slackware advocate, has centered his efforts in Multimedia applications, specially sound processing and streaming. Carlos Andrés Pérez is an especialist in Molecular Simulation, Candidate to Phd in Biotechnology. Technical advisor for the Grupo de Investigación en Educación Virtual (GIEV) Virtual Education Research Group. Address: Universidad Santiago de Cali, Calle 5ª carrera 62 Campus Pampalinda, Cali – Colombia. Translated to English by: Juan Manuel Triana <jutriana/at/uniweb.net.co> Content: |
A short guide to the installation of CVW under Linux![[Illustration]](../../common/images/article310/cvwlogo.jpg)
Abstract:
CVW (Collaborative Virtual Workspaces) is one of the finest
open source tools available for the development of virtual
education. This article describes the process of installation
and running in Suse Linux Professional 8.0. |
The GIEV group at Universidad Santiago de Cali in Colombia, has been working for several years in researching new platforms and virtual environments that allow an easy integration with the existent education methods. After several testing of commercial software we began to look for in Open Source development and discovered CVW. It has all the main elements that we were looking for, so we decided to try.
CVW is not easy to install, as we soon discovered. In the next lines I'll describe the process to put running this wonderful platform on Suse 8.0.
We used an IBM Netvista machine to use as server for this software. The machine has a Pentium 4 at 2.0Ghz, 256MB Ram and 40G Harddrive, connected to the University network. The Suse installation went clean, only the video give me some trouble (an integrated Intel 845), but with a kernel compilation the video was soon running well (1024x768 at 24 bits).
The first step is to download the software from the project website:
We need to get the following applications:
There is also the CVW Federated server available which applies only to a cluster of CVW servers.
First install the CVW server. We untarred the file in /opt/CVWserver and created an user to run it. The script to run the server is
./cvw.boot start
And to end the execution:
./cvw.boot stop
The software recommended to create an user, we created the
user cvw and gave it the rights on the directory. When you look
at the script file (cvw.boot) you must enter some data like the
installation directory and, the most important, the TCP port
where CVW will check for client connections. By default the
assigned port is 8888. You only have to add it in the
/etc/services script. The only thing that you must change when
installing under Linux is the line that fixes the maximum number of
clients, by default is unlimited, but in Linux this will cause
the service to crash.
When you connect with a browser you will be greeted with the
following message:
<!--YourMOO-->
<!--
Welcome to the Collaborative Virtual Workspace.
This is version 4.0.2 of the CVW core.
If you are not using a CVW client ...
type: connect username password
to connect as an existing user
type: quit
to disconnect
-->
I don't understand that. Valid commands at this point are
Help, COnnect, or Quit
This means that our server is ready to serve any client. The second step (and the most painful) is to install the document server.
Untar it in /opt/cvwdocserver and look at the README file. Now it is
time to make your first decission.
The CVW docserver uses Mysql as database and Tomcat (an Apache Java utility)
to handle all documents stored in the virtual workspace. The
tar.gz file includes a jakarta/tomcat directory and a complete
mysql installation (3.23.27-beta)
We don't like beta versions and Suse had a newer jakarta and
mysql versions that were running fairly well, so we decided to
adjust it to the docserv requirements. With mysql there were no
problems, we only move the database file to my existent
installation (/var/lib/mysql).
The real problem came with the Tomcat configuration. Trying to
adapt the existent jakarta to the configuration of CVW's tomcat
was a headache, because the commands were located in different
parts, so at least we decided to run the included
Jakarta/Tomcat.
But you must change several thing in order to get a running application: we left the jakarta/tomcat directory under my docserv tree (/opt/cvwdocserv). In your apache configuration file (/etc/httpd/httpd.conf) you must add a line pointing it:
Include /opt/cvwdocserver/jakarta/tomcat/conf/tomcat-apache.conf
Now to the tomcat-apache.conf file. You have to give the exact address of the jserv module in apache
LoadModule jserv_module libexec/mod_jserv.so
Also you must indicate the correct address of your tomcat installation and the port to listen (my choice was 8007, after several trials):
ApJServDefaultPort 8007
AddType test/jsp .jsp
AddHandler jserv-servlet .jsp
Alias /examples
/opt/cvwdocserver/jakarta/tomcat/webapps/examples
<Directory
"/opt/cvwdocserver/jakarta/tomcat/webapps/examples">
Options Indexes FollowSymLinks
</Directory>
ApJServMount /examples/servlet /examples
<Location /examples/WEB-INF/ >
AllowOverride None
deny from all
</Location>
Alias /test /opt/cvwdocserver/jakarta/tomcat/webapps/test
<Directory
"/opt/cvwdocserver/jakarta/tomcat/webapps/test">
Options Indexes FollowSymLinks
</Directory>
ApJServMount /examples/servlet /examples
<Location /examples/WEB-INF/ >
AllowOverride None
deny from all
</Location>
Alias /test /opt/cvwdocserver/jakarta/tomcat/webapps/test
<Directory
"/opt/cvwdocserver/jakarta/tomcat/webapps/test">
Options Indexes FollowSymLinks
</Directory>
ApJServMount /test/servlet /test
<Location /test/WEB-INF/ >
AllowOverride None
deny from all
</Location>
ApJServMount /servlet /ROOT
Once this is done, you must change the docserver script, cvwds.boot that use the same arguments as cvw.boot (start | stop). We only changed the local directories for the docserver and the database and commented the line that shuts down the mysql server (because we have our own databases running).
Also you must check that the .jar files inside the webapps/app directory must be there and not in subdirectories.
If you are lucky you are almost done.
The final step is to untar the client file. We did it under /opt/CVWclient/ . The script with all the needed data is called server.cvw, in my case the lines that we modified were the following:
# Property file for CVW
#
cvw.server.host=cvw
cvw.server.port=8888
cvw.server.name=cvw
cvw.docserver.host=cvw
cvw.docserver.port=8080
cvw.docserver.url=/app/docservlet
cvw.version=4.0
cvw.debug=true
#############
# User Images
#############
#this url must end with a /
cvw.userimages.url=http://localhost/cvw/user-images/
The cvw.docserver.url is key... we don't know why the original points to another direction and you discover after several trials that this is the MOST IMPORTANT line to get acces to your docserver.
At this moment you are ready to enter the first time to your CVW server. For your first login you will enter as "Admin" with no password.
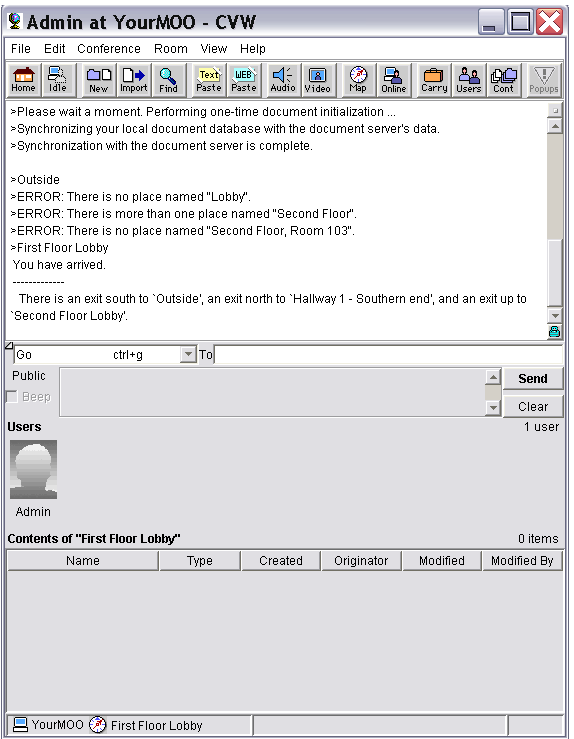
Now you can change your password under "File" and use the Admin Tool under "View".
As the menu shows, there's a lot of tools available and that make this application a reference in virtual education.
This configuration is working now in our server. You can try this utility. If you wish want information: they have a good manual in pdf.
Enjoy.
|
|
Webpages maintained by the LinuxFocus Editor team
© Juan Manuel Triana,Carlos Andrés Pérez, FDL LinuxFocus.org |
Translation information:
|
2003-08-30, generated by lfparser version 2.38